Once you have defined your users for your Express Cloud Service, all users with the role of Database Developer or higher can access the database Service Console. From here all database related actions can be started.

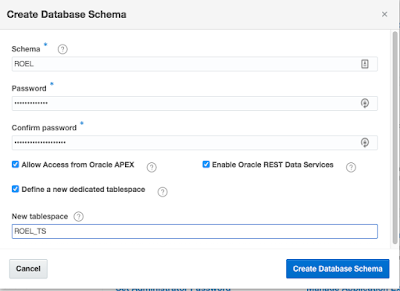 You can define whether the schema should be accessible from within APEX and creating an separate tablespace is optional.
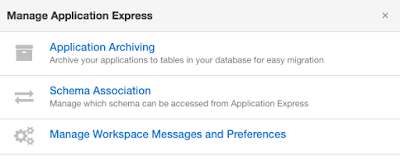 You can enable Application Archiving (using the Application Archive packaged app), enable or disable workspace-to-schema associations and manage a very small number of workspace preferences.


The upper category, Web Access, brings you to the specified part of the APEX builder - more on that in the next post. In the lower category you can create database schema's. For our goal within smart4apex, I created a schema for every developer.
 You can define whether the schema should be accessible from within APEX and creating an separate tablespace is optional.
I haven't played around with the Document Store yet, so I have to skip that part. You can also set the password of the administrator of your PDB - the most privileged user within your PDB you have access to. Franck Pachot did an excellent writeup about the privileges of that user. I hoped the "Manage Application Express" would bring me to the "APEX Admin" environment - a.k.a. the "INTERNAL" workspace. But in fact it's a very downsized form of that.
 You can enable Application Archiving (using the Application Archive packaged app), enable or disable workspace-to-schema associations and manage a very small number of workspace preferences.
What I had expected and missing the most here is the option to create multiple workspaces! So one EECS instance means one and only one APEX Workspace! I still haven't found the document that lists that limitation. That was a real surprise for me.
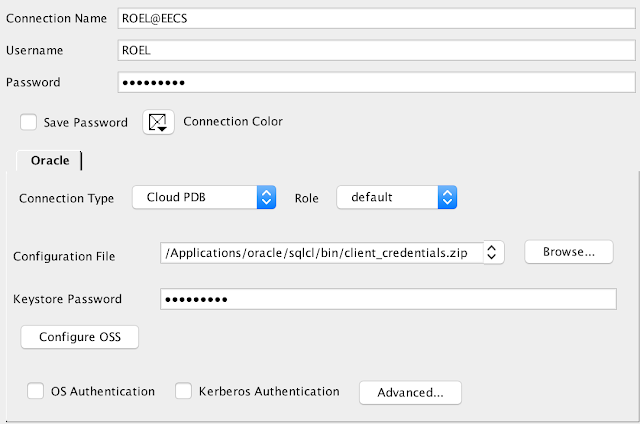
The middle part of the Service Console is the most interesting one for this post. As we would like to access our EECS database like a local one! Assuming you have your favorite tool (SQL Developer, SQL Plus or sqlcl already installed), you have to download the "Client Credentials". On downloading you have to enter a password. You'll need that again to set up the connection using SQL Developer. So fire up a a recent version - I used 4.2 - of SQL Developer and define the connection, using "Cloud PDB" as the Connection Type, point the Configuration File to the downloaded zip file and enter the previous defined password. Make the connection and voila, you are running SQL Developer connecting to a 12.2.0.0.3 database in the cloud!

And while you can do most of the regular database development stuff, there is quite a list of restrictions, limitations and issues, all listed in this document. So no multimedia, spatial, RAS, to name a few.
Connecting with sqlcl is just as simple. Drop the zip-file in a location easy to find by sqlcl (as you can see in the screenshot above, I dropped it in the sqlcl/bin directory). Fire it up with "sqlcl /nolog" and define the cloud configuration using the zip file:
set cloudconfig /Applications/oracle/sqlcl/bin/client_credentials.zip
As you don't want to type that line each and every time, it's convenient to put that in a login.sql file in the sqlcl directory.
The zipfile is unzipped in a new directory on your file system - it seems to create a new directory each and every time you issue that command. I hope it gets cleaned up somewhere somehow eventually ...

And is it fast? It feels pretty fast - hey it is an Exadata machine - , but now and then I noticed some latency in the connection. Not too bad and expected as the server is in the US. I'm sure that will be a lot better once there will be a real European roll-out. In the Service Console there is a little diagnostics tool hidden in the menu in the upper right corner where you can measure your latency. I measured it three times and the latency was around 180ms on average. So that's not super, but not really annoying in a sqlcl / SQL Developer environment. But what would happen if I start clicking around in the APEX Builder?
Comments